
Hi again.
I'm back with more digi tips and ideas. Today, paper piecing with digital stamps and papers, and how to get more from your images. :)
But first, HERE is a link to the PDF for my Day 2 tutorial.
But first, HERE is a link to the PDF for my Day 2 tutorial.
My card for this tutorial features a stamp from Hero Arts Happy Thanksgiving digikit, but it is NOT a Thanksgiving card. :) Instead, I've used the turkey stamp from the kit, and turned it into a peacock.
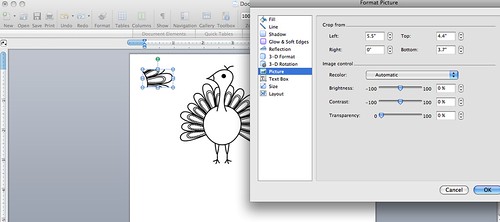
To do this, first I imported the image into Word, resized it and printed it onto kraft card. This would create the peacock's body. Then I copied the image to create 2 identical peacocks. Next, I simply cropped the two images down until I had just one feather from each side remaining:
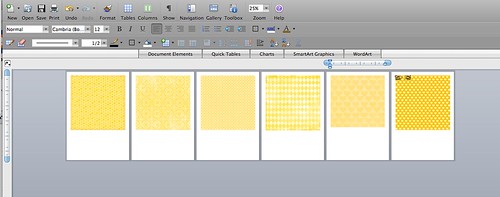
Next, it's time to import and resize the patterned papers... For my card, I wanted feathers in rainbow colours and I needed several feathers in each colour. BUT, I wanted each feather to be a different pattern and shade. :) So I went through all my digikits and selected all my yellow papers, importing them into my document.
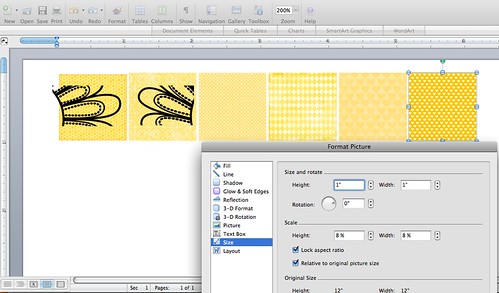
Then, I resized the papers to 1" square - slightly larger than the size of the feathers.
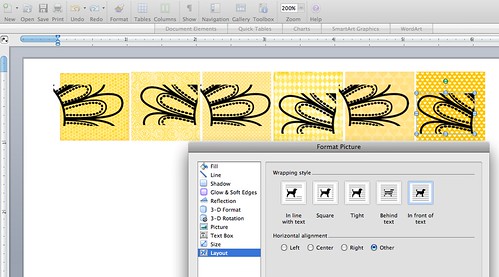
Finally, I copied and pasted my feathers, making sure that the Layout was set to In Front of Text, and moved them on top of each piece of patterned paper.
Once I had one row, I printed them out then started again with a new document. If you try to put too many images and papers in one document it slows Word down a LOT. :)
After printing, I trimmed the row from the paper and reloaded the same sheet back in for the next colour row.
I repeated the process with all the other colours - yes this card took AGES - until I had all my feathers. Once they'd dried thoroughly, I cut them out, paper pieced the peacock together and stuck it to my card. I added the Stickles when everything was stuck in place on the card.
And here's the finished card with a close-up of the shimmery Stickles goodness. I added a custom sentiment made using the fabulous Say It (In Pieces) digikit.


So, my tip for the day: look closely at the stamps in your themed kits and sets and see if you can use them in other ways... making the most of your stamps means you get much more for your money and who doesn't want that?? :) For example: the witch's hat in Hero Arts' A Night for Fright digikit would be great for a Harry Potter themed birthday card. The mug of cocoa from the Cozy Treats set could easily be altered for a fun 'let's have coffee' card. Cut the antlers off the sweet reindeer in the Winter Forest and he could be used on any card.
To do this, first I imported the image into Word, resized it and printed it onto kraft card. This would create the peacock's body. Then I copied the image to create 2 identical peacocks. Next, I simply cropped the two images down until I had just one feather from each side remaining:
Next, it's time to import and resize the patterned papers... For my card, I wanted feathers in rainbow colours and I needed several feathers in each colour. BUT, I wanted each feather to be a different pattern and shade. :) So I went through all my digikits and selected all my yellow papers, importing them into my document.
Then, I resized the papers to 1" square - slightly larger than the size of the feathers.
Finally, I copied and pasted my feathers, making sure that the Layout was set to In Front of Text, and moved them on top of each piece of patterned paper.
Once I had one row, I printed them out then started again with a new document. If you try to put too many images and papers in one document it slows Word down a LOT. :)
After printing, I trimmed the row from the paper and reloaded the same sheet back in for the next colour row.
I repeated the process with all the other colours - yes this card took AGES - until I had all my feathers. Once they'd dried thoroughly, I cut them out, paper pieced the peacock together and stuck it to my card. I added the Stickles when everything was stuck in place on the card.
And here's the finished card with a close-up of the shimmery Stickles goodness. I added a custom sentiment made using the fabulous Say It (In Pieces) digikit.
So, my tip for the day: look closely at the stamps in your themed kits and sets and see if you can use them in other ways... making the most of your stamps means you get much more for your money and who doesn't want that?? :) For example: the witch's hat in Hero Arts' A Night for Fright digikit would be great for a Harry Potter themed birthday card. The mug of cocoa from the Cozy Treats set could easily be altered for a fun 'let's have coffee' card. Cut the antlers off the sweet reindeer in the Winter Forest and he could be used on any card.
23 comments:
Thanks for these great tutorials! And your card...WOW! It looks absolutely amazing!
i love these tutorials, they are sooo helpful. I may even use the hundreds and hundreds of digi papers that I've been collecting now. I have bought digi stamps, but didn't know how to use them or what to do with them!! TFS.
BTW this card is GORGEOUS!!
YOU'RE an amazing cardmaker, lol! I had a feeling you would go down the rainbow route but I never guessed you would put that many feathers on til I scrolled down, the finished product is fantastic, well done! (and you make Word look so easy, it drives me up the wall most days!)
wow, wow, wow, thanks SO MUCH for putting this series up!! I am trying to get "into" digital work but it is so hard playing around to learn it!! Your posts are great and so helpful!! Again, thank you ever so much!!!
What an incredible peacock you created! I love it!
Oh My Gosh! I absolutely ADORE this card, don't think I'd have the patience to create it but it was sooo worth all your effort!
Thanks so much for these tips - so good to hear the one about too many graphics slowing Word down. So helpful. What patience and perseverance to produce that amazing card!
I am very impressed with what you get to do with Word. I find it very interesting that you share these tutorials for people who can not afford Photoshop or other software.
You always make the most fabulous rainbow coloured cards!
WOW! This is an amazing card and I appreciate all the work you put into it!!
So clever, you have the patience of a saint to do that. Linda x
I love rainbow and I LOVE this card! Absolutely amazing Lucy!
I love your card and your fabulous tutorial! Thank you for taking the time to create and share this tutorial. I would love to see more tutorials!
Fantastic. Thank you again for your great tips. Wow, that peacock looks amazing!
This card is so beautiful! Thank you for these tutorials! Question - Lets say you only have a paper collection in one color but each paper has a different pattern. Does Word allow you to import those papers and change the colors of them? Just curious! Again, Lucy, thanks for sharing your genius!
All I can say is WOW!!! What a gorgeous card. Once again thanks so much for all your top tips.
So glad I found these tutorials! I've often drooled over digital kits but thought I needed Photoshop or similar to play with them properly. Thanks for showing us how to use them with Word! Ger x.
Wow Lucy this card is stunning! What a great tutorial today. Is it ok to pin this to Pinterest? If not I will take it down. Thanks in advance xoxoxoxo
Awesome, Lucy! Did you make that card before Lucy was born?? You are amazing with Word!
..the graduation of colour is lovely! I want to learn how to do all this!
Dee x
oh my word! Stunning! I fear i don't have the patience for all that!
Thank you so much for these tutorials, they're so useful! I love this card, it must have been a pain to cut all the pieces out though!!!! It looks fab!
This is gorgeous! Thank you so much for the tips!
Post a Comment