
Some basic instructions for using HA Digital Images with Microsoft Word (please note, although I have a Mac, it is virtually the same as Word for Windows)
1. To print an image.
Once you have purchased the kit from 2Peas online shop, you are able to download it instantly onto your computer.
Then, open Word and start a new document. (I have a Mac, but it is the same in Word for Windows)
Go to 'Insert Picture' - 'From File'. Then go to your "downloads" file, and choose the picture you want to play with. It will then load it into Word.

Resize it to the size you want, then print! Note that many of the HA images are already coloured and therefore only require cutting out.

The black images or overlays can be printed directly onto patterned paper.
2. To play with an image.
Click 'Format' and then 'Picture' and play with the settings. You just need to experiment a bit. It is surprisingly easy once you get going.

I know this is very basic - I am NOT a techno expert. I have been playing with Photoshop too, but have mostly been using Word to print out the coloured images. It is SO easy!
If anyone would like any help with Photoshop, leave me a comment here, but I just used Shari's excellent tutorial here to guide me in changing the colour and brightness of images.
So finally, I thought I'd give a step-by-step for one of my HA Hybrid Digital cards.
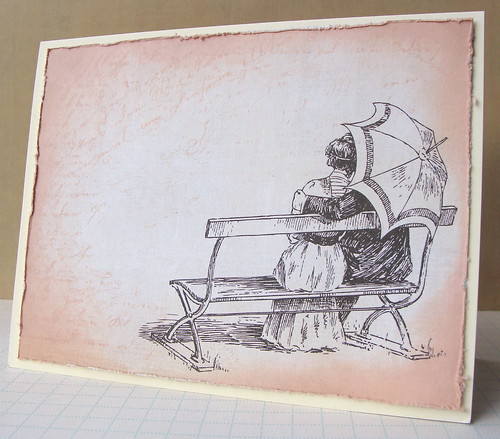
1. I selected the image from the Hero Arts Digikit Vintage Lifestyle.
2. I inserted it into a Word document and resized it to fit on a Hero Arts notecard.
3. I printed the image onto some patterned paper by My Mind's Eye.
4. I randomly stamped Hero Arts 'Old Letter Writing' stamp onto the edges of the paper with Tattered Rose distress ink. I then inked the edges with a distress ink blending tool and distressed using a ranger distressing tool (OK, I am addicted to Ranger products at the moment).
5. Finally, I adhered the paper to a Hero Arts cream notecard.
I hope this tutorial is not too patronising - I just know that I was a bit overwhelmed by digital a few weeks ago, and now I am addicted. I was so surprised by how easy it is. And FUN. HA are adding new images to their collection at 2Peas almost every week. There are some AMAZING kits on their way too. Keep your eyes peeled. :)
18 comments:
Lucy, thanks for this great tutorial - not patronising at all, just clear and easy to follow. I love the image that you have chosen to use. It is my Parent's 50th Wedding anniversay in two weeks time and I have been struggling to find the right stamp/picture for their card - this really could be the one! Thank you so very much!!!! Jo x
Lucy, thanks for the tutorial. It
is very helpful, not patronizing!
For those of us not very techno
savvy, it is good to start with the
basics.
Thanks for the tutorial and your card is beautiful.
Eveline.
Very very pretty! I simply love the distressed look you gave it!
Yaneri
www.scrapycrafter.com
Thanks Lucy - it was great to have it explained in a way I understood. I'm not into fully digital cards but love being able to print out bits so I can do hybrid cards. I already do this with clip art and other internet images but it so great to have ones made just for cards and scrapbooking
Seriously you made it so easy! I totally will be trying it your way!
I like things nice and simple at first so 'thank you'
it opens up a whole new world of possibilities...
Perfect tutorial Miss (now, wait! It's MRS!) Lucy!!!!
I love instructions that are clear!
xo
WOW - Love this tutorial and the card. It is not at all too basic. I am just starting with the digital stuff and love the Hero Arts images. Thanks for sharing and taking the time to explain it all.
Such a wonderful tutorial, Lucy! Big hug and thanks from a computer illiterate friend....Now I'm inspired to try the digital stuff!
thank you for this, lucy - i just purchased my first digi elements and made my very first digi card - so fun! you made it seem so easy so i gave it a go and ummmm, i feel an obsession coming on!
Oh, Lucy! This is perfect. Thank you so much for doing this. I really want to try digital!! It's hard to believe you have just learned how to do digi! Your work is so amazing.
Thanks for this post! I thought I had to have photoshop to use the HA images. Now I know I can play with them a little in word! :)
I'm so excited to try these in Word since I don't have a photo editing software. However, when I try to open the file, I receive a window asking "convert file from" with a long list of choices. Any suggestion on the next step? I selected a few ( not really knowing what I'm doing!) but none worked. Hope you can help!
I love your work!
Lucy - I just found your excellent tutorial after I sent you the May-Day. Your tutorial is superbly written and I thank you for the wonderful screen shots. This ought to do it for me so I can resize my digi-images. Thanks so much! Please disregards my earlier request.
Hello Lucy :-)
The tutrial IS great :-)
Yet I think it's almost impossible to use when creating an album page or is there somthing i'm missing ?
another issue is the acid of the ink that is important not to have in albums. What do you think ?
Thanks:-)
Hi!
Wanted to let you know I posted a link to this tutorial on my blog today.
Nancy Ward
http://www.nancywardcrafts.com
Post a Comment